This past Christmas my wife and I embarked on a brave, 3-month-long mission to produce 13 hand-made messenger bags for our family members, based on the Cooper Bag from Colette patterns.
Of course by “we” I mean mainly Sara. She did 95% of the sewing, although I did venture into previously scary territory and during the final week of production, learned how to use a serger and at least pulled some of my weight. And I have the pin punctures and steam burns to show for it. Sewing…not for the squeamish.
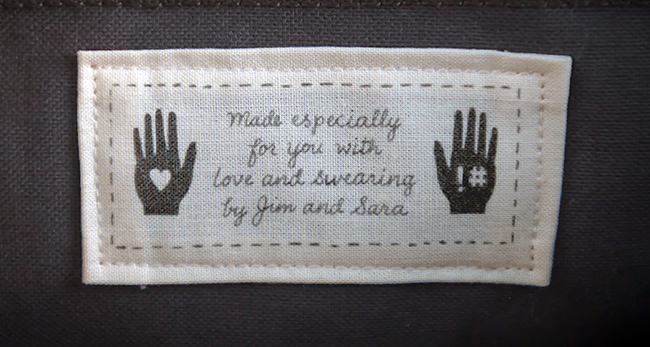
I also designed the custom labels we sewed into the interior lining of each bag. And the process of making those was so simple and fun I couldn’t resist sharing. I originally tried printing the labels directly on fabric using my Gocco press and it was an epic fail, mainly due to the small text size just not rendering with enough clarity. So desperate to find an alternative and with the Christmas clock ticking I tried this solution from DIY Network:
You’ll need:
- Your original artwork, scanned to size and set up to print multiple copies on a sheet
- Freezer paper
- Iron
- Fabric to print on
- An inkjet printer
- Cut freezer paper to 8.5 x 11 (or whatever your printer can handle). Probably best to stick with standard sheet sizes initially.
- Cut your fabric slightly larger than the freezer paper.
- Note: There is a thickness threshold that varies from printer to printer, but basically your fabric and freezer paper have to make it through your printer so printing on heavy canvas probably kill most inkjet printers.
- Lay the freezer paper on an ironing board shiny side up, place the fabric on top, wrong side down, cover with a piece of muslin or thin ironing cloth.
- Iron over the piece for about 45 seconds on high. The freezer paper should securely adhere to the cloth.
- Trim away excess cloth to make corners and edges flush.
- Place freezer paper/fabric in your inkjet printer so the side facing up is the side printed on. Use the highest quality settings in your printer settings dialog.
This worked the first time flawlessly using a cheap, freebie all-in-one printer. The freezer paper easily peels off the fabric and leaves a detailed, well-inked image behind. Since then we’ve upgraded to a bigger and much better quality printer and we’re already envisioning printed fabric for pillows, etc.